

Key Takeaways
A careful diagnosis matters as much as the replacement itself. The right parts, safe installation, and a sensible post-repair check will help restore predictable handling.
- Confirm the symptoms before buying replacement parts.
- Match every part to the model year, axle, and suspension layout.
- Support the vehicle securely and treat compressed springs as hazardous.
- Replace related worn hardware when inspection shows it is no longer serviceable.
- Test-drive the vehicle and arrange an alignment when suspension geometry may have changed.
Why your Haval may need new shock absorbers
Shock absorbers control suspension movement after the spring responds to a bump, dip, or braking load. When they lose damping ability, the vehicle can feel unsettled even if the springs and tires appear serviceable. A Haval shock absorbers replacement should therefore begin with diagnosis rather than a guess based only on mileage.
Common symptoms of worn shocks
The usual clues include repeated bouncing after a bump, a front end that dives more than expected under braking, and a rear that feels loose over uneven pavement. You may also notice excessive body movement in corners or a new tendency for the vehicle to feel busy on a road it previously handled comfortably.
Fluid around the shock body is another warning sign, although a small amount of dirt or moisture is not automatically proof of failure. Compare both sides of the axle and look for a clear leak, damaged rod, dented casing, or torn bushing. A proper inspection is more useful than treating one symptom as a final diagnosis.
How braking, handling, and ride comfort are affected
Damping helps keep the tires in contact with the road while the suspension moves. If it is weak, braking can feel less composed, steering response may become vague, and the body can continue moving after the initial bump. The ride may be harsh in one situation and floaty in another, depending on whether the problem is a seized component, a weak damper, or a worn mounting part.
This does not mean new shocks will cure every handling complaint. Tire pressure, alignment, spring condition, bushings, and steering components can all influence the same driving sensations. A balanced diagnosis prevents unnecessary parts replacement and makes the repair easier to evaluate afterward.
Distinguishing shock failure from tire or suspension problems
Uneven tire wear can accompany weak shocks, but it can also result from incorrect pressure, poor alignment, or worn suspension joints. A clunk over one sharp bump may point toward a mount, link, or bushing rather than the damper itself. Similarly, pulling under braking deserves a broader brake, tire, and alignment inspection.
If you are considering used components, a used struts and shocks guide can help organize checks for fitment, leaks, corrosion, mounts, and return terms. Used parts require especially careful matching by model, generation, axle, and side.
When a visual inspection is enough to confirm a concern
A visual inspection can confirm an obvious oil leak, cracked rubber, bent hardware, severe corrosion, or a damaged protective boot. It cannot reliably measure damping performance by itself, and the familiar bounce test is only a rough clue. Compare the complete assembly with the opposite side and inspect nearby components before deciding what to order.
If the vehicle feels unstable, the tire is lifting unevenly, or a suspension part is visibly damaged, avoid treating the issue as cosmetic. Arrange a professional assessment before driving farther than necessary.
How to choose the right replacement parts
Parts that look similar can have different mounting points, lengths, valving, or load ratings. Start with the vehicle identification number where possible, then confirm the model, model year, engine or trim details, axle, and left-or-right fitment. This is where a little extra checking can prevent a costly installation problem.
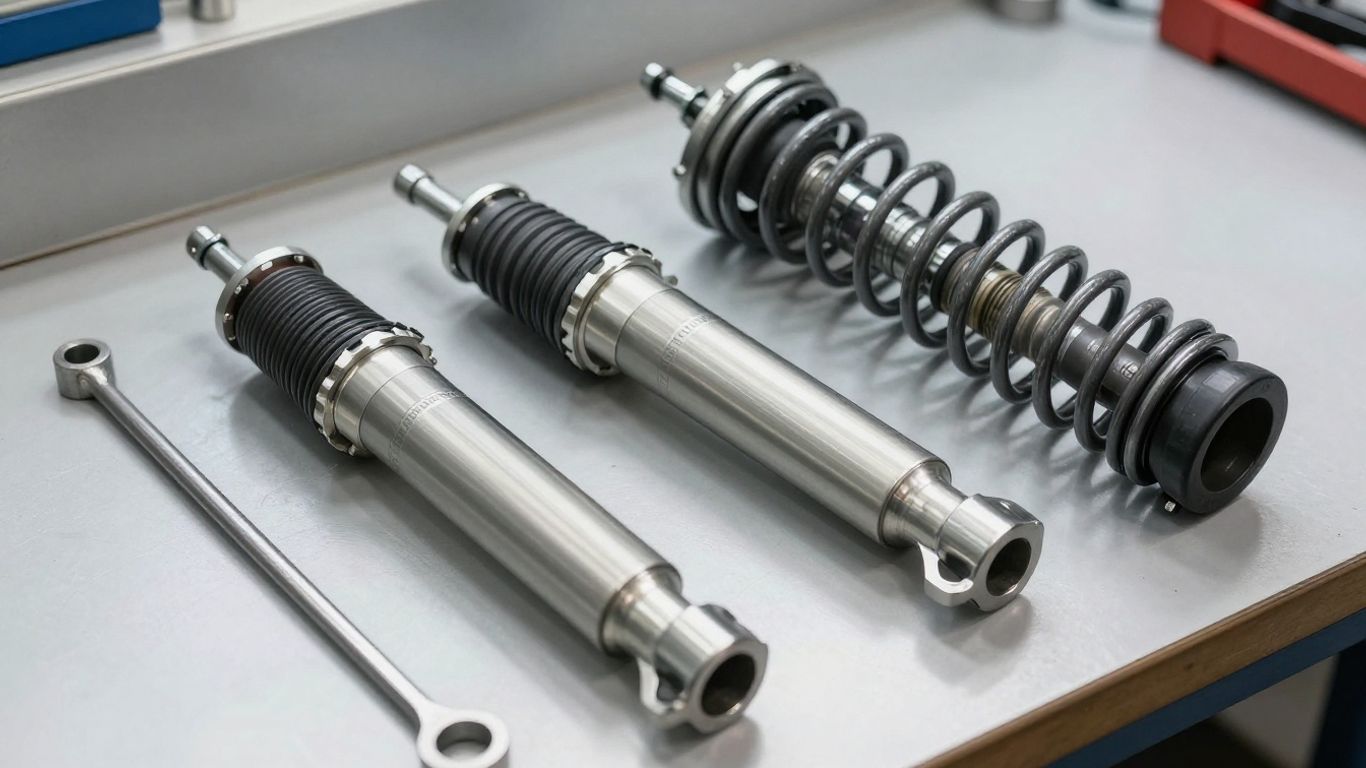
Matching the shocks to your Haval model and model year
Catalog information should be treated as a starting point, not the only proof of fit. Confirm whether the vehicle has a standard, sport, or other suspension specification, and compare the old part’s mounting arrangement with the replacement listing. For a used part, request clear photos and verify that the seller accepts returns if the fit is not correct.
A Haval H2 replacement cost guide is useful for seeing why model details, parts choice, labor, and alignment can all influence the final bill. Its information should not be treated as a universal quote for every vehicle or market.
Comparing OEM, aftermarket, and performance options
An original-equipment replacement is usually selected when preserving the factory feel and known fitment is the priority. A reputable aftermarket damper may offer a suitable alternative, but specifications and warranty terms still need checking. Performance-oriented parts can change ride and handling characteristics, so they should suit the vehicle’s springs, tires, load use, and the driver’s expectations.
Do not choose solely by the lowest unit price. Include delivery, hardware, warranty coverage, and the possibility of replacing related components when comparing options.
Checking front strut and rear shock compatibility
A front strut may combine the damper with the spring seat and steering-related mounting arrangement, while a rear shock may be a separate damper beside the spring. The two designs are not interchangeable, and even parts for the same axle can differ by generation or suspension package.
Before ordering, compare the part number, mounting eye or stud, overall dimensions, and whether the component is supplied as a complete strut or an insert. Never assume that a rear shock listing fits every rear suspension layout.
Understanding when mounts, boots, and bump stops should also be replaced
Mounts and bearings carry loads and allow the strut to move as the steering turns. Boots protect the piston rod, while bump stops limit compression near the end of travel. If any of these parts are cracked, crushed, noisy, seized, or contaminated, replacing only the damper may leave the original complaint partly unresolved.
Ask for a component-by-component inspection rather than automatically replacing every surrounding part. The right scope depends on condition, access, mileage, and whether labor to reopen the assembly would otherwise be repeated.
What to prepare before the replacement
Read the service information for the exact vehicle before lifting it. The job may involve high spring forces, awkward fasteners, and components that affect steering or wheel alignment. If the required equipment or procedure is unfamiliar, a qualified workshop is safer than improvisation.
Essential tools and replacement hardware
Prepare a quality jack and axle stands, wheel chocks, sockets, breaker bar, torque wrench, penetrating fluid, and suitable hand tools. You may also need new self-locking nuts, mounting hardware, or manufacturer-specified fasteners rather than reusing old items. Keep the replacement parts together and compare them with the removed parts before disassembly.
Useful preparation includes:
- Photographing the assembly and routing of lines before removal.
- Labeling left and right parts and keeping fasteners with their location.
- Checking the specified torque values for every critical joint.
- Having replacement mounts, boots, bump stops, or bushings available if inspection warrants them.
That list reduces interruptions, but it does not replace the vehicle-specific service procedure. Do not substitute an impact tool for a torque check on final assembly.
Safe lifting and vehicle-support procedures
Park on a firm, level surface, apply the parking brake, and chock wheels that remain on the ground. Lift only at approved points, then lower the vehicle onto stands rated for its weight. Never rely on a hydraulic jack alone while removing a wheel or working beneath the vehicle.
Keep hands clear of pinch points and support a suspension arm when its normal load may change. Before loosening a fastener, consider where the assembly could move once its support is removed.
Inspection points to check before removing the old parts
Look over brake hoses, ABS wiring, tires, spring seats, control-arm bushings, ball joints, links, and mounting studs. Note any existing alignment or ride-height issue before the repair, because it may not be caused by the shocks. Measuring ride height on both sides can also give you a useful comparison after installation.
Clean exposed threads where appropriate, but do not damage rubber parts with unsuitable solvents. If a fastener is badly corroded or a joint spins instead of loosening, stop and choose a controlled repair method.
Why spring compressors require extra caution
A coil spring stores considerable energy when compressed. A poorly positioned, damaged, or incorrectly used compressor can slip and release that energy suddenly. This is one of the clearest points at which home repairs can become dangerous.
If the front assembly requires spring transfer, use equipment designed for the spring and follow its instructions exactly. Many owners are better served by having a workshop compress and transfer the spring, even if they understand the remaining installation steps.
How to replace the front shock absorbers
Front suspension designs vary, but a strut removal generally affects the wheel, steering knuckle, brake or ABS routing, and upper body mount. Marking positions can help with reassembly, yet marks do not replace torque specifications or a post-repair alignment check. Work methodically and keep the vehicle supported throughout.
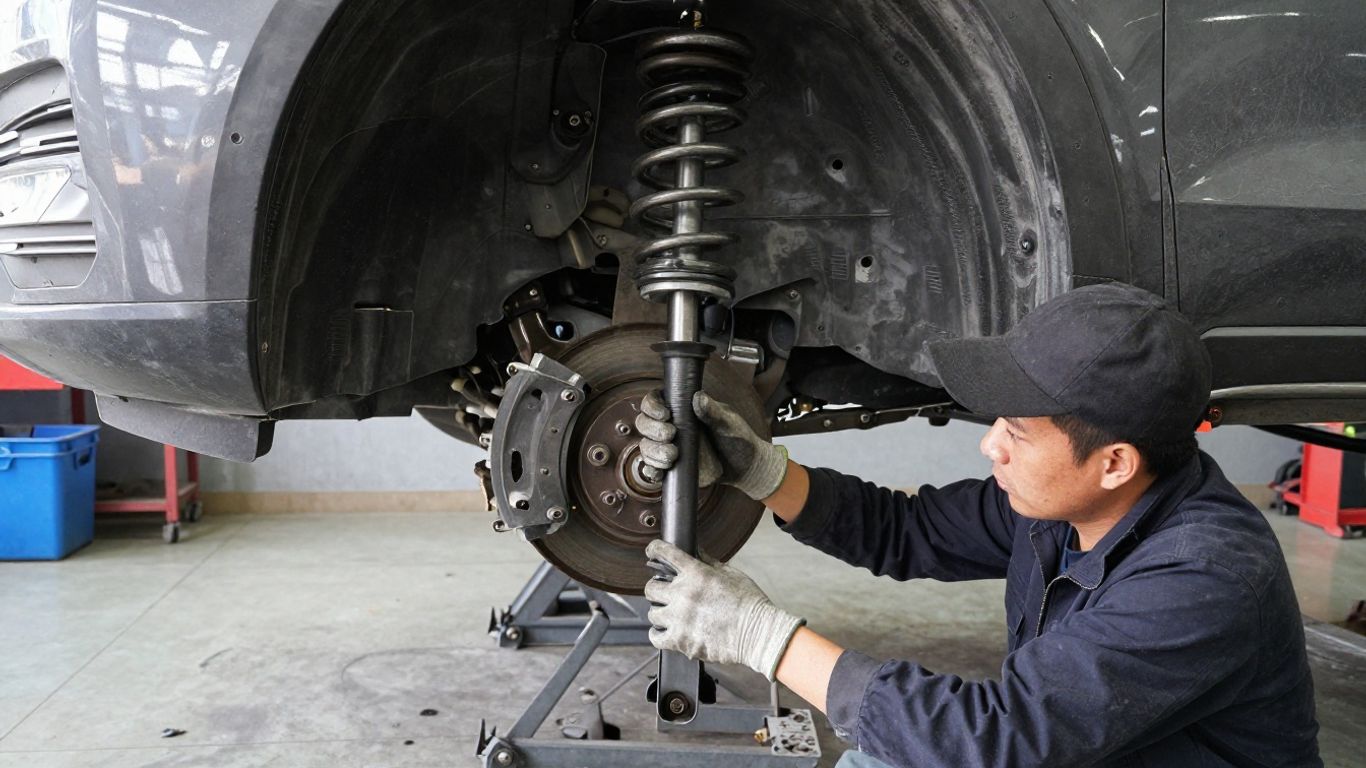
Removing the wheel and accessing the strut assembly
Loosen the wheel fasteners while the vehicle is on the ground, lift it at the approved point, and secure it on stands. Remove the wheel and identify the strut, brake hose bracket, ABS sensor wire, sway-bar connection, and upper mounting area. Support any component that could hang from a hose or cable.
Clean the exposed fasteners and take a reference photograph. If the vehicle has a sensor or bracket attached to the strut, record its routing before separating it.
Detaching the strut from the steering knuckle
Support the steering knuckle or lower suspension as needed before removing the lower strut fasteners. Separate the upper mount only after the assembly is controlled, and do not allow the knuckle to pull on the brake hose or sensor wire. Corroded joints may need penetrating fluid, correct sockets, and a controlled method approved for the vehicle.
Do not hammer directly on a precision mating surface or force a component whose movement is unclear. The service information should determine whether camber-related bolts or other alignment-sensitive fasteners are being disturbed.
Replacing the strut, mount, and related components
Compare the replacement assembly with the old one for length, bracket position, spring-seat orientation, and mounting hardware. If transferring the spring, use a proper compressor and inspect the spring, isolators, mount bearing, boot, and bump stop while the assembly is apart. Replace a damaged part now rather than paying for the same access twice.
A complete replacement strut can reduce assembly work, but it still must match the vehicle’s specification. Do not mix components merely because their external dimensions appear close.
Reinstalling the assembly and tightening fasteners correctly
Guide the assembly into position without forcing the upper studs or twisting attached lines. Start all fasteners by hand, reconnect brackets and links, and tighten critical joints to the specified sequence and torque. Some suspension fasteners must be tightened at normal ride height to avoid preloading a rubber bushing.
Refit the wheel, lower the vehicle carefully, and retorque the wheel fasteners as specified. The first drive should be short and cautious, with attention to noise, steering feel, and any warning light.
How to replace the rear shock absorbers
Rear shock replacement is often more straightforward than front strut work, but access and suspension design still vary. The spring may be separate from the damper, or the shock may be part of a different rear layout. Identify the mounting points and support arrangement before removing anything.
Identifying the upper and lower shock mounts
Follow the shock body from its lower attachment to the upper mount, looking for an eyelet, stud, rubber bush, sleeve, or bracket. Interior trim, wheel-arch liners, or underbody shields may hide the upper fastener. Photograph the arrangement before loosening it, especially when washers and spacers have a particular order.
The shock should not be confused with a lift support used for a hood or tailgate. A hood lift support listing concerns body fittings, not the suspension dampers discussed here.
Supporting the suspension before removing the old shock
Even when the spring is separate, the suspension can move as the shock is removed. Support the relevant arm with a stand or jack in a way that does not create an unsafe lifting point. Remove the fasteners gradually and keep clear of the path in which the arm or shock could shift.
If the vehicle is lifted by the body, the suspension may hang lower than it does at rest. That changes the angle of the hardware, so support the suspension appropriately before final removal.
Installing the new shock and checking its bushings
Compare the new shock’s length, orientation, and bushing arrangement with the old unit. Install sleeves, washers, and rubber bushes in the correct order, then start both ends before tightening either one fully. Inspect for bushing distortion and make sure the shock body or rod is not contacting a nearby component.
Tighten according to the service information and, where required, at normal ride height. A bushing clamped at the wrong suspension position can wear quickly or create noise.
Differences between common Haval rear suspension layouts
Some vehicles use a separate spring and shock, while others package suspension components differently. A Haval H6 suspension overview describes a front MacPherson arrangement and rear layouts that may be double-wishbone or multi-link, so model and generation details matter before ordering parts. Treat that information as an example of why a generic rear-shock instruction cannot cover every configuration.
Confirm the actual layout under the vehicle and use the matching procedure. If the replacement changes ride height or suspension geometry, plan for an inspection and possible alignment afterward.
How much Haval shock absorbers replacement may cost
The final price depends on the vehicle, axle, part specification, access, and condition of nearby hardware. A low online parts price does not necessarily equal a low installed cost. Ask for a written estimate that separates parts, labor, taxes, disposal, and any alignment or follow-up work.
Parts pricing by model, axle, and brand
Front struts can cost more than simple rear shocks because they may include additional hardware or require spring transfer. Complete assemblies, premium dampers, standard replacements, and used components all have different risk and warranty profiles. Verify that a quote covers one unit or a pair.
For used parts, weigh the purchase price against inspection time, shipping, return conditions, and the chance of repeating labor. A cheaper part is not economical if it is incorrect or already worn.
Labor time and workshop-rate considerations
Labor varies with access, seized fasteners, spring-transfer requirements, and the workshop’s hourly rate. Front work may take longer when the strut must be dismantled, while rear access may be slowed by trim or underbody panels. Ask whether the quoted time includes cleaning, inspection, and a final road test.
A workshop should explain additional labor before proceeding, particularly if corrosion or damaged mounts changes the original job.
Additional costs for mounts, springs, and alignment
Mounts, bearings, boots, bump stops, springs, bushings, and fasteners can add to the estimate when inspection finds wear. Wheel alignment may also be recommended after front strut removal or whenever steering and tire wear indicate changed geometry. These are not automatically unnecessary extras, but they should be tied to a clear finding or procedure.
The best quote makes the distinction between required work, prudent related work, and optional upgrades. That gives you room to make an informed decision without hiding the safety implications.
When replacing shocks in pairs is the better value
Replacing both shocks on the same axle helps keep damping more consistent from side to side. If one unit has clearly failed, the other may have similar age and service history even if it is not leaking. Pair replacement can also avoid paying another round of access labor soon afterward.
There are exceptions, such as a recently replaced matching unit with documented condition. Discuss the history and measured findings rather than following a blanket rule.
How to verify the repair and prevent premature wear
Verification should be part of the repair, not an afterthought. Recheck the work visually, confirm the wheels and fasteners are secure, and pay attention to how the vehicle behaves at low speed before entering faster traffic. A short, controlled test can reveal an installation issue early.
Checking ride height, noises, and fastener security
Park on level ground and compare left-to-right ride height after the vehicle has settled. Look for pinched wiring, displaced boots, loose brackets, leaking fluid, or a spring that is not seated correctly. Listen for knocks, rubbing, squeaks, or a metallic click while turning the steering and moving slowly over a small bump.
Recheck accessible fasteners according to the service procedure. Do not simply tighten everything harder; over-tightening can damage threads, bushes, or mounting hardware.
When a wheel alignment is recommended
An alignment is sensible when front struts, steering-related fasteners, control arms, or other geometry-affecting components have been disturbed. It is also worth arranging when the vehicle pulls, the steering wheel is off-center, or tire wear was already uneven. Rear suspension work may require a check too, depending on the design and which parts were removed.
Alignment cannot repair a loose joint or bent component, so inspect the suspension first. It should be the final adjustment after mechanical faults have been addressed.
Road-testing for bouncing, pulling, and instability
Begin at low speed in a safe area and test gentle braking, steering inputs, and small surface changes. The vehicle should settle without repeated bouncing, track predictably, and remain free of new noises. Increase speed only when the basic checks are satisfactory.
Stop the test if the car pulls sharply, the steering feels loose, a warning light appears, or a noise suggests contact between moving parts. Those signs call for another inspection rather than a longer drive.
Maintenance habits that extend shock absorber service life
Correct tire pressure, sensible loading, and prompt attention to leaks or damaged boots reduce unnecessary stress on the suspension. Avoid repeatedly striking potholes at speed, and keep mud or corrosive deposits from building around mounts and fasteners. Regular tire and suspension inspections can catch a related fault before it damages a new damper.
Keep the repair invoice and part numbers with the vehicle records. That history makes the next diagnosis easier and helps determine whether a future issue is a new fault or a continuation of the original one.
Conclusion
A successful Haval shock absorbers replacement is more than removing an old damper and installing a new one. Confirm the fault, match the part carefully, work safely, inspect related hardware, and verify the result with a controlled road test and alignment when appropriate.
Frequently Asked Questions
How often should shock absorbers be replaced?
There is no universal interval because road quality, load, climate, driving style, and component quality all affect wear. Replace them when inspection and driving symptoms show loss of performance or physical damage.
Can one shock absorber be replaced by itself?
It can be physically possible, but replacing both units on the same axle usually provides more consistent damping. A recently replaced matching unit may be an exception if its condition and specification are known.
Is a leaking shock absorber always failed?
A clear oil leak is a strong reason for inspection and often indicates replacement is needed. Light grime or moisture alone is not conclusive, so compare the component with the opposite side and seek a proper assessment.
Do new shocks improve braking distance?
They can help maintain tire contact and body control, but braking distance also depends on tires, brakes, road conditions, load, and driver input. New shocks cannot correct a defective brake or tire system.
Do shocks need to be replaced with springs?
Not automatically. Springs should be replaced when they are broken, sagging, corroded, or otherwise outside specification. Inspect springs and their seats while access is available.
Is wheel alignment necessary after shock replacement?
It is recommended when the work disturbs alignment-sensitive mounting points or when the vehicle shows pulling, an off-center steering wheel, or uneven tire wear. The exact need depends on the suspension design and procedure.
Can a home mechanic replace shock absorbers safely?
Rear shocks may be manageable with the correct tools and support, but front struts can require spring compression and careful handling of steering components. If spring compressors or vehicle support are unfamiliar, use a qualified workshop.